Thursday, November 10, 2011

Programmatically Change the Attributes of a Control in a GridView TemplateField

In a GridView row or a cell u can directly change the attributes.
Eg:

//In a row
GridView1.Rows[i].CssClass = "row_style";

//In a cell
GridView1.Rows[i].Cells[j].CssClass = "cel_style";

Here “i” and “j” are int numbers.

But in a GridView TemplateField , you can’t change the attributes of a control that way.
So in the fallowing example I have shown you how to do that.

In this example I have changed the “CssClass” attribute of an ASP button control.

Sample Grid view :
<asp:GridView runat="server" ID="GridView1" AutoGenerateColumns="false">
<Columns>
<asp:BoundField DataField="Name" HeaderText="Name" />
<asp:BoundField DataField="Age" HeaderText="Age" />
<asp:TemplateField>
<ItemTemplate>
<asp:Button ID="btnRemove" Text="Remove" CommandName="btnRemove_Click" CommandArgument="<%#Eval("Age")%>"
runat="server" />
</ItemTemplate>
</asp:TemplateField>
</Columns>
</asp:GridView>

In “RowDataBound” event you can change the attributes of the control that you want…

//Code
GridView1.DataSource = dt; // dt is a DataTable
GridView1.RowDataBound += new GridViewRowEventHandler(GridView1_DataBound);
GridView1.DataBind();
//Code
/// <summary>
/// Handles the DataBound event of the GridView1 control.
/// </summary>
/// <param name="sender">The source of the event.</param>
/// <param name="e">The <see cref="System.Web.UI.WebControls.GridViewRowEventArgs"/> instance containing the event data.</param>
private void GridView1_DataBound(object sender, GridViewRowEventArgs e)
{
Button btnRemove = (Button)e.Row.Cells[2].FindControl("btnRemove");
if (btnRemove != null)
{
btnRemove.CssClass = "btn_73_dis";
}
}

Saturday, November 5, 2011

How to copy unsigned 3rd party assemblies to GAC

Here are the steps to sign a third party dll with a strong name and deploy it into GAC.

1. Generate a key file using SN.exe utility which is provided with .NET framework.
sn -k myKeyFile.snk
Here, myKeyFile.snk is the name of the key and it stores under c:\GACDemo directory.

2. Now make a copy of the third party dll that you want to sign.
Here, I'm using OauthLibrary.dll

3. Now dis-assemble the assembly
ildasm OauthLibrary.dll /out:OauthLibrary.il

4. Output after the dis-assemble the above assembly --> following files were created under my directory.

5. Now rename the assembly (In my case I used OAuthLibrary.dll.orig, You can give a name as per your preference).
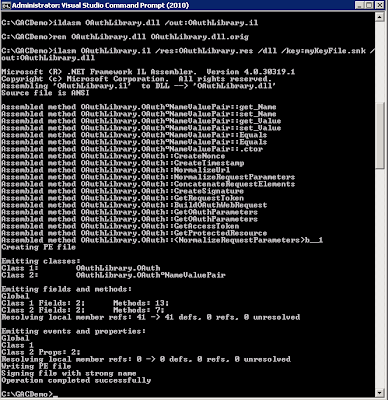
ren OauthLibrary.dll OauthLibrary.dll.orig
Now the dll has renamed into OAuthLibrary.dll.orig as follows

6. Now re-assemble the particular dll with the generated strong name key
ilasm OauthLibrary.il /res:OauthLibrary.res /dll /key:myKeyFile.snk /out:OauthLibrary.dll
Output after running the above command,
Now the signed dll has been copied into the working directory as follows, (Check your working directory, in my case its, C:\GACDemo\)

7. Verify your signed dll using the following command.
sn -vf OauthLibrary.dll

8. Above verified dll is allowed to add into GAC using “gacutil -i” or drop it to C:\Windows\assembly folder by dragging it.