Monday, July 13, 2026

Why Did My Unmanaged Layer Disappear After Importing a Managed Solution? – A Deep Dive into Dataverse Solution Layering

While working on a Dynamics 365 solution migration, I came across a scenario that appeared to contradict one of the platform's most well-known rules.

"Unmanaged customizations always take precedence over managed solutions."

At first glance, the behavior didn't make sense. After investigating further, it became clear that Dataverse's solution layering model is more sophisticated than most documentation suggests.

This article walks through the scenario, explains what actually happens behind the scenes, and clarifies why the unmanaged layer didn't "lose"; it simply ceased to exist.


The Scenario

Imagine the following environments:

DEV -> TEST

Step 1 – Import as an Unmanaged Solution

In the development environment, I created a new custom field.

Solution A (Unmanaged)

    Account
        + new_testfield

I exported this solution as Unmanaged and imported it into the TEST environment.

At this point, the layer stack looked exactly as expected.

    Unmanaged
    ------------
    new_testfield
    ------------
    System

So far, everything was normal.


Step 2 – Package the Same Component as Managed

Later, I created another solution.

Instead of creating a new field, I simply included the same table and field in another solution.

Solution B

    Account
        + new_testfield

This time, I exported it as a Managed Solution and imported it into the TEST environment using Stage for Upgrade.

After the upgrade was completed, I opened the Solution Layers expecting to see:

    Unmanaged
    ------------
    Managed
    ------------
    System

Instead, I found this:

    Managed
    ------------
    System

The unmanaged layer had completely disappeared.

At first glance, this seems to violate the well-known rule that unmanaged customizations always have the highest priority.

So what actually happened?


The Common Misconception

Many developers imagine solution layers like this:

Unmanaged
Managed
System

where every imported solution permanently exists as another layer.

That isn't how Dataverse works.

An unmanaged import is not another installed solution sitting above managed solutions.

Instead, unmanaged customizations represent the current editable definition of a component.

A better mental model is:

Current Customization rather than Installed Unmanaged Solution

This distinction is the key to understanding the behavior.


What Happens Internally?

Every Dataverse component contains much more than just its metadata.

Internally, Dataverse tracks information such as:

  • Component identifiers
  • Solution component records
  • Publisher information
  • Dependency relationships
  • Solution ownership
  • Layer metadata

When the field was first imported as an unmanaged solution, Dataverse created the component and stored its current definition.

There wasn't a managed package behind it.

The unmanaged customization effectively became the authoritative definition of that component.


Importing the Managed Solution

When the managed solution was imported later, Dataverse compared the incoming component against the existing one.

It recognized:

  • The schema name matched.
  • The publisher matched.
  • The component lineage matched.
  • The component already existed.

Instead of creating another competing copy, Dataverse performed component ownership reconciliation.

Rather than ending up with:

    Unmanaged
    ------------
    new_testfield

    Managed
    ------------
    new_testfield

Dataverse effectively transformed the component into:

    Managed
    ------------
    new_testfield

The unmanaged ownership was no longer required.


Why Doesn't Dataverse Keep Both?

Imagine if Dataverse allowed both the unmanaged and managed ownership models to remain for the same component.

Now consider what would happen if you later uninstalled the managed solution. Should the field disappear? Probably not, because the unmanaged customization still owns it.

On the other hand, imagine removing the unmanaged customization. Should the managed version continue to exist? If both ownership models were retained, the platform would effectively have two independent owners for the same component.

This raises several questions. Which owner should Dataverse use when tracking dependencies? Which one is responsible for uninstalling the solution? How should the platform determine the component's lifecycle when ownership is split?

To avoid this complexity, Dataverse prefers a single ownership model whenever possible. When a managed solution contains what appears to be the same component, Dataverse evaluates several characteristics to determine whether it can safely reconcile the ownership:

  • Schema Name – Confirms that the component being imported is the same logical component.
  • Publisher – Ensures the component originates from the same solution publisher.
  • Component Lineage – Verifies that the component shares the same identity throughout its lifecycle and isn't a different component with similar metadata.
  • Metadata – Confirms that the component definition (such as properties and configuration) is identical, with no local overrides or conflicting changes.

If these characteristics match, there is little value in retaining redundant unmanaged ownership. Instead of maintaining duplicate ownership models, Dataverse reconciles the component and treats the managed solution as the authoritative owner.

As a result, the unmanaged ownership becomes redundant and is removed, leaving a single managed representation of the component.


This Is NOT the Same as Overriding a Managed Component

This is where the famous statement:

"Unmanaged customizations always win."

Let's consider a different scenario.

Suppose the managed solution already exists. You then open the target environment and modify the field's display name.

Managed layer:

    Display Name = Customer Rating

Local unmanaged customization:

    Display Name = Client Rating

Now the layers become:

    Unmanaged Override
    ------------------
    Display Name = Client Rating

    Managed Base
    -------------
    Display Name = Customer Rating

Here, the unmanaged layer remains because it contains a genuine override of the managed component, which requires Dataverse to preserve both layers, as they represent different values.

Why My Scenario Was Different

In my case, both definitions were identical.

The unmanaged component and the managed component described exactly the same field. There were no local modifications. No overridden properties. No conflicting metadata.

Because there was nothing to override, Dataverse optimized the component ownership and removed the redundant unmanaged layer.

The managed solution became the sole owner.


The Role of "Stage for Upgrade"

This behavior is particularly noticeable during a solution upgrade.

An upgrade import is much more than a standard solution import.

Internally, Dataverse performs operations such as:

  • Installing a holding solution
  • Comparing incoming components
  • Reconciling dependencies
  • Updating solution ownership
  • Cleaning obsolete solution references
  • Optimizing solution layers

As part of this cleanup, redundant unmanaged ownership may be removed when the managed solution fully represents the same component.


When Would the Unmanaged Layer Stay?

The unmanaged layer would remain if there were actual customizations in the target environment.

For example:

  1. Install the managed solution.
  2. Modify the field directly in the target environment.
  3. Publish the customization.

Now the unmanaged layer contains real overrides and cannot simply disappear.

Similarly, if any metadata differs between the managed definition and the local customization, Dataverse preserves the unmanaged layer because it represents meaningful changes.


The Real Rule

Many people summarize solution layering with:

Unmanaged always has the highest priority.

A more accurate statement would be:

When multiple layers define different values for the same component, unmanaged customizations override managed layers.

Notice the important condition:

          Both layers must actually exist.

In my scenario, Dataverse determined that there was no override. There were simply two representations of the exact same component. Instead of maintaining duplicate ownership, it reconciled them into a single managed component. The unmanaged layer didn't lose. It simply became unnecessary.


Key Takeaway

This behavior often surprises even experienced Dynamics 365 developers because Microsoft's documentation focuses heavily on layer priority, but spends very little time explaining component ownership.

The key lesson is this:

  • Unmanaged layers only exist when there is something to override.
  • Identical managed and unmanaged definitions do not necessarily result in two layers.
  • During managed solution upgrades, Dataverse may reconcile ownership and remove redundant unmanaged customizations.

Understanding this distinction makes many seemingly "strange" solution-layering behaviors much easier to explain.

  • The unmanaged layer wasn't ignored.
  • It wasn't overridden.
  • It wasn't a lower priority.
  • It simply ceased to exist because Dataverse no longer needed it.

Tuesday, October 7, 2025

Upcoming Power Automate Trigger URL Change: How to Identify and Fix Affected Flows


What’s Changing

Microsoft has announced a critical update to Power Automate affecting flows that use HTTP triggers or Teams Webhook triggers with URLs containing logic.azure.com.

Starting August 2025, these flows will begin migrating to a new URL format. By November 30, 2025, the old URLs will stop working entirely, causing affected flows to fail unless they are updated.

If your organization relies on HTTP-triggered flows or Teams Webhooks, this change could impact automated integrations, notifications, and connected systems.


What You Need to Do

You need to identify which flows are affected across your Power Platform environments and update them before the November deadline.

Microsoft provides a simple PowerShell cmdlet that lists flows with old trigger URLs — but running it manually for dozens of environments would be painful. But you can use the approach below.


List Down the Affected Flows Across All Environments

If you have multiple environments (e.g., 20–30), you can automate the detection process and generate a single CSV report.

Here’s a PowerShell script that loops through every environment in your tenant, checks for affected flows, and exports the results:

# Install the Power Platform PowerShell module Install-Module -Name Microsoft.PowerApps.Administration.PowerShell -Force # Connect to your Power Platform account Add-PowerAppsAccount # Retrieve all environments $environments = Get-AdminPowerAppEnvironment # Initialize an array to collect results $results = @() foreach ($env in $environments) { Write-Host "Checking environment: $($env.DisplayName)" $flows = Get-AdminFlowWithMigratingTriggerUrl -EnvironmentName $env.EnvironmentName foreach ($flow in $flows) { $results += [PSCustomObject]@{ EnvironmentName = $env.DisplayName FlowDisplayName = $flow.DisplayName FlowName = $flow.FlowName } } } # Export all results to a CSV file $results | Export-Csv -Path "MigratingFlowsReport.csv" -NoTypeInformation Write-Host "Report generated: MigratingFlowsReport.csv"

The generated MigratingFlowsReport.csv will look like this:

EnvironmentName     FlowDisplayName     FlowName
Production     HTTP Data Push     1234abcd
Dev     Teams Alert Bot     abcd5678


Fix the Affected Flows

Once you’ve identified the flows, you need to update each one manually in the Power Automate designer.

 1. Update HTTP Trigger Flows

  1. Open the flow in Power Automate Designer.

  2. Click on the HTTP trigger (the first step of the flow).

  3. You’ll see a new HTTP POST URL automatically generated in the updated format (azure-apihub.net).

  4. Copy this new URL.

  5. Locate any external systems, scripts, or apps that send requests to the old logic.azure.com URL — and replace it with the new one.

  6. Save and Test the flow.

2. Update Teams Webhook Flows

For Teams Webhook triggers (for example, if a flow posts messages to a Teams channel):

  1. Open the flow in Power Automate Designer.

  2. Recreate or re-authenticate the Teams Webhook trigger.

  3. Copy the new Webhook URL generated for the flow.

  4. Update any external systems, PowerShell scripts, or connectors that post messages to the old webhook endpoint.

  5. Save and test to ensure Teams notifications are still firing correctly.


Timeline & Next Steps

  • August 2025: Microsoft begins moving HTTP and Teams Webhook flows to new URLs.

  • November 30, 2025: Flows still using old logic.azure.com URLs will stop working.

To stay ahead:

  • Run the above script now and review your report.

  • Update affected flows in the designer to use the new trigger URLs.

  • Notify system owners or integration partners if they need to update external calls.


Sunday, May 24, 2020

Are booking rules available only in hourly view in D365 CRM schedule board?

I think you have experience with schedule board in D365 CRM. If you need to create a booking rule, there are so many articles that you can fallow. Here is the link for MSDN article.

https://docs.microsoft.com/en-us/dynamics365/field-service/set-up-booking-rules

So, I'm not going to describe how to create a booking rule here. But I'm going to explain a limitation I faced and a workaround for that limitation.

I created a booking rule and noticed that booking rule is working only in hourly view. Hence I contacted Microsoft and below is their response.

"The booking rule only works in Schedule Board Hourly view, we have a plan to implement it for Daily, Weekly and Monthly view but those changes most probably will be available after those views will be re-designed."

Microsoft is currently redesigning the Schedule Board and we won't get this available soon.
Hence, below is my workaround for this.

Workaround :
Instead of using the Javascript as booking rule functionality, you can use a plugin on the create message of Bookable Resource Booking, my recommendation is to use the pre-validation or pre-operation phase in order to avoid sending the transaction to the DB, ideally the pre-validation is better.

By using the workaround:
Booking rule works in all the views and it shows a nice error message in all the views.
  • In all other views, except in hourly view, it shows the error message as below(This is the main advantage).

  • In hourly view, it shows the error message by suing the popup which is used in OOB booking rules. There is a drawback in hourly view, that the error message is not nice as in OOB booking rules. Hence I have proposed a solution for this under "Extend Solution" below.
  • It gives only the errors and does not have the ability to give warnings and allow to do the booking with warnings.

By using the OOB booking rules:

  • Main drawback is that this works only in hourly view.
  • The biggest advantage is that this gives a nice error message as well as it gives the opportunity to create the records with warnings.
    • Errors
    • Warnings - Allows to continue and do the booking or cancel.


Extended Solution :

Use both OOB booking rules and Pre-Validation plugin in bookable resource booking create.
  • Since the OOB booking rules uses JavaScript and JavaScript fires first, it gives you the nice error message in hourly view instead of the error message view have explained earlier. In other views it works with the plugin and gives the error message as I described earlier.
  • In hourly view, you get an extra ability to use the warning feature.

Have fun with booking rules😊


Tuesday, May 19, 2020

Implement multi level project approval for D365 PSA

In D365 PSA, we do not get the multi level approval functionality in the OOB time/expense approval process.
But I know some of our customers need to have multi level approvals for some of their daytoday business process(specially for expense approval).

When we click the approve button in project approval records(Either using the home ribbon button or form ribbon button), it invokes below OOB msdyn actions accordingly.

Expense approval
  • msdyn_ExpenseEntriesPendingApproval
  • msdyn_ExpenseEntriesApprove
Time Approval
  • msdyn_TimeEntriesPendingApproval
  • msdyn_TimeEntriesApprove

Below is my solution for extending the OOB project approval functionality to enable multi level approvals for PSA. In this article my main intention is just to give you an idea about how to extend above actions to implement multi level approvals. Hence you can use that concept and implement your own extended solution.

Solution:
  1. Create your own setting entity to configure and enable multi level approval("Approval Rule" is my entity). 
  2. Create your own entity to configure approval hierarchy("Approval Hierarchy" is my entity).
    • Has a 1:N relationship with Approval Rule entity.
    • Contains the approvers and the hierarchy.
  3. Create your own entity or add new fields to Project Approval entity to track your current approver and the status. (I prefer to use a new entity "Approval Tracking")
  4. Create a new plugin for post create event in Project Approval entity and create new approval tracking record/s accordingly.
  5. Create pre execute plugins accordingly for above mentioned msdyn actions and implement below logic.
    • In Pending Approval action
      • Remove the id/s form approval action unless it has passed through the hierarchy. (I have explain id removal process below under tips to remove ids form approval and the example.)
    • In Approve action
      • If the project approval record is not in the last approval stage according to the hierarchy, assign the project approval record to the next approver in the hierarchy.
      • Update relevant Approval Tracking entity record with the current stage.
      • Remove the id/s form approval action unless it has passed through the hierarchy. (I have explain id removal process below under tips to remove ids form approval  and the example)
Tips to remove ids form approval :
  • In expense approval actions, the entries for approval are passed to the actions as a string and the input parameter "ExpenseEntryIds" holds the value. 
  • In time approval actions, the entries for approval are passed to the actions as a string and the input parameter "TimeEntryIds" holds the value.
  • From home ribbon button click, it sends all the selected record ids as a comma separated string and from form ribbon button click it just send the relevant record id as a string.
Example :
Step 1: Write a new plugin for msdyn_ExpenseEntriesApprove action.
// Get the entry ids to process from input parameters. var entryIdsToProcess = localContext.PluginExecutionContext.InputParameters["ExpenseEntryIds"].ToString(); // Implement your own method with custom logic to remove expense ids which are not in final stage of the approval process. var newEntryIdsToProcess = RemoveEntryIds(localContext, entryIdsToProcess); // Update ExpenseEntryIds with newEntryIdsToProcess. localContext.PluginExecutionContext.InputParameters["ExpenseEntryIds"] = entryIdsToProcess;

Step 2: Register your plugin for for the pre operation of msdyn_ExpenseEntriesApprove action.


I hope using above steps, you can implement your own, multi level approval solution for PSA.
If you face any issue while implementing, please add a comment or send me a direct message. I'm happy to help you.

Happy coding 😊


Monday, March 2, 2020

Add event on subgrid refresh - Dynamics CRM.

You may need to execute some custom action on your parent form, when you add some records using quick create forms. As an example you may need to disable a field on work order form when you add work order incidents using quick create form.

In this case, you can add a subgrid event listener to your subgrid to perform your logic.
  1.  Create a javascript file as a web resource and add below functions to your javascript file.
  2. function AddSubgridEvents(executionContext) {
      var formContext = executionContext.getFormContext(); 
    
      addSubgridEventListener(formContext);
    } 
    
    function addSubgridEventListener(formContext){
      var gridContext = formContext.getControl("SUBGRID_ID");
      
      //ensure that the subgrid is ready…if not wait and call this function again
      if (gridContext == null){
         setTimeout(function () { addSubgridEventListener(formContext); }, 500);
         return;
      }
      
      //bind the event listener when the subgrid is ready
      gridContext.addOnLoad(subgridEventListener);
    }
    
    function subgridEventListener(gridContext){
        // Gets the form context using subgird context
        var formContext = gridContext.getFormContext();
    
        // Implement your logic here...
    }
  3. Include your javascript file in form libraries.
  4. Add your "AddSubgridEvents" function to Form Onload event handler and pass the execution context as a parameter.
Happy coding 😎

Monday, August 26, 2019

RetrieveMultiple plugins for both Unified Interface and classic UI in D365


I hope you have experience with writing plugins on RetrieveMultiple message. Even though you do not have experience with writing plugins on RetrieveMultiple message, this will help you when you write a new plugin.

Before the Unified Interface for Dynamics 365 comes in to play, it used the QueryExpression in RetrieveMultiple. But the Unified Interface Dynamics 365 uses FetchExpression. Meanwhile classic UI  uses the QueryExpression as usual.
So if your system already have plugins for RetrieveMultiple message, it won't work for UCI. Hence you may need to modify those to work for both UCI and classic UI.

Following sample code snippet will help you to write/update your plugins on RetrieveMultiple message.

if (context.MessageName == "RetrieveMultiple" && context.Stage == 20 context.Mode == 0 && context.InputParameters.Contains("Query") && ((context.InputParameters["Query"] is QueryExpression) || (context.InputParameters["Query"] is FetchExpression)))
{
 // For QueryExpression (For Classic UI)
 if (context.InputParameters["Query"] is QueryExpression)
 {
  var  queryExpression = context.InputParameters["Query"] as QueryExpression;
  var queryExpressionToFetchXmlRequest = new QueryExpressionToFetchXmlRequest()
  {
   Query = queryExpression
  };
  var queryExpressionToFetchXmlResponse = (QueryExpressionToFetchXmlResponse)service.Execute(queryExpressionToFetchXmlRequest);
 }
 // For FetchExpression (For UCI)
 else if(context.InputParameters["Query"] is FetchExpression)
 {
  var  fetchExpression = context.InputParameters["Query"] as FetchExpression;
  var fetchXmlToQueryExpressionRequest = new FetchXmlToQueryExpressionRequest()
  {
   FetchXml = fetchExpression.Query
  };
  var fetchXmlToQueryExpressionResponse = (FetchXmlToQueryExpressionResponse)service.Execute(fetchXmlToQueryExpressionRequest);
 }
}

You can change the code inside the block as you wish to implement your logic and enjoy πŸ‘


Thursday, June 6, 2019

Voice of the Customer : Script Error in UCI

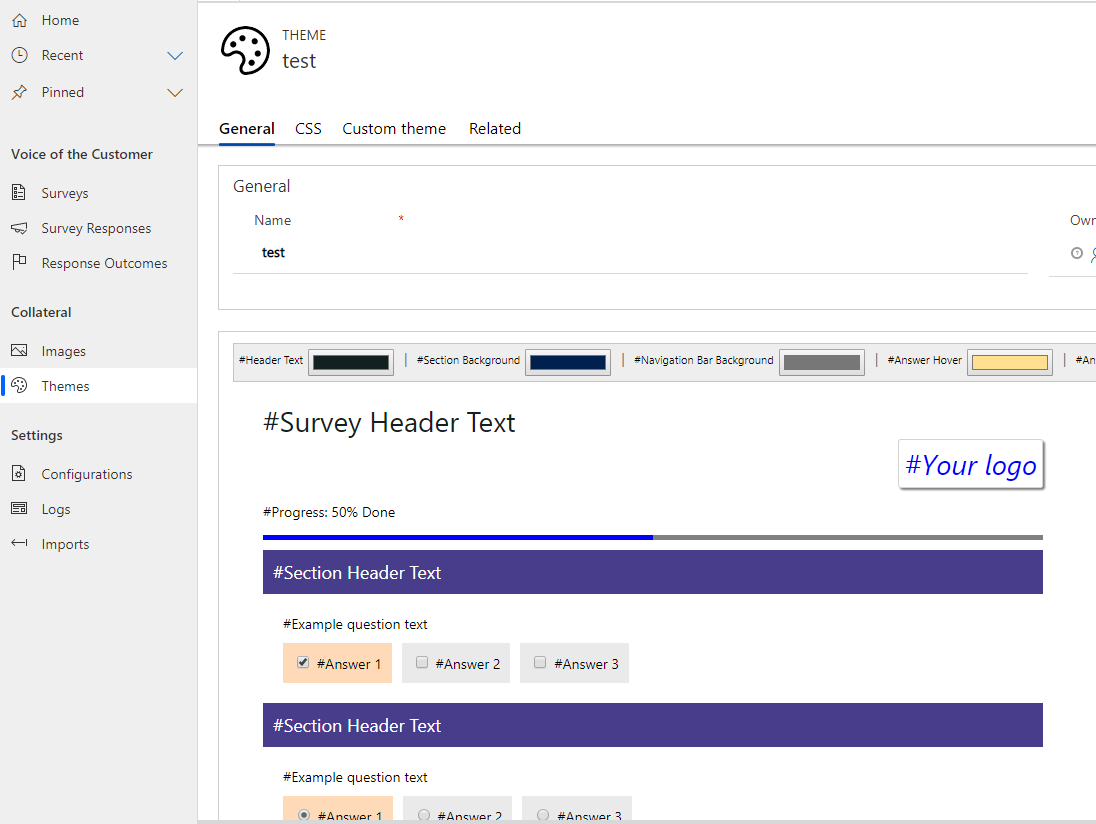
If you use Voice of the Customer app, you may have experienced following script error, when you edit and save the colors of a theme in UCI.
If you use Dynamics 365 — custom application. You won't get this error. But it is not the fix for this 😏

If you have this issue, when you open the theme in UCI, you may see the them as below.


Then after you edit the colors of the theme and save, it will give you a script error as below.


Since editing a themes is core function of the Voice of the Customer app you need to have the correct privilege in order to change the proprieties of the themes.

So in order to correct this please follow below steps. 
  1. Go to Settings-> Security -> Users
  2. Select the user
  3. Click Manage Roles button in the ribbon.
  4. Add the following security role:

After this your issue should be fixed and you will see the survey template as below.


UCI is not a daemon, enjoy it 😎