Wednesday, April 4, 2018

Errors importing marketing list entity in Dynamics 365 v9

When you try to move your customization in  marketing list entity in Dynamics 365 v9, you may receive an error importing the customization.

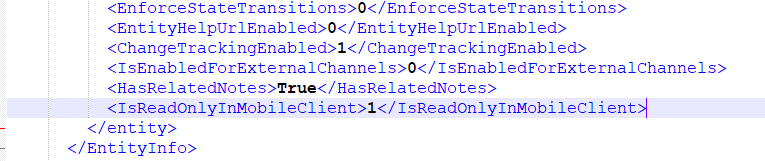
By default "Read-only in mobile" is selected. Since "Enable for mobile" is not selected, "Read-only in mobile" is not included in the exported solutions customization XML.

You can fix this issue by following  below steps. 
  1. Extract the solution and open the customization XML file
  2. Locate the List entity in the XML file
  3. Add the following tag in the XML file:<IsReadOnlyInMobileClient>1</IsReadOnlyInMobileClient>
  4. Zip the solution and import it again

Monday, February 27, 2017

Deleting Calendar Rules in Microsoft Dynamics CRM 2016

/// <summary>
/// Clears the calender rules.
/// </summary>
/// <param name="service">The service.</param>
/// <param name="bookableResourceId">The bookable resource identifier.</param>
/// <param name="startDate">The start date.</param>
/// <param name="endDate">The end date.</param>
public static void ClearCalenderRules(IOrganizationService service, Guid bookableResourceId, DateTime startDate, DateTime endDate)
{
    using (var context = new CrmServiceContext(service))
    {
        var bookableResource = context.BookableResourceSet.Where(b => b.Id == bookableResourceId).FirstOrDefault();

        if (bookableResource?.CalendarId != null)
        {

            Entity entity = service.Retrieve("calendar", bookableResource.CalendarId.Id, new ColumnSet(true));
            EntityCollection entityCollection = (EntityCollection)entity.Attributes["calendarrules"];

            int num = 0;
            List<int> list = new List<int>();
            foreach (Entity current in entityCollection.Entities)
            {
                DateTime dateTime2 = Convert.ToDateTime(current["starttime"]);
                if (dateTime2 >= startDate && dateTime2 <= endDate)
                {
                    list.Add(num);
                }

                num++;
            }

            list.Sort();
            list.Reverse();

            for (int i = 0; i < list.Count; i++)
            {
                entityCollection.Entities.Remove(entityCollection.Entities[list[i]]);
            }

            entity.Attributes["calendarrules"] = entityCollection;
            service.Update(entity);
        }
    }
} 

How to remove all NewLines from a variable in SQL Server

Declare @A NVarChar(500);

Set @A = N' 12345
        25487
        154814 ';

Set @A = Replace(@A,CHAR(13)+CHAR(10),' ');

Print @A;

Creating Calendar Rules in Microsoft Dynamics CRM 2016

/// <summary>
/// Creates the calender.
/// </summary>
/// <param name="service">The service.</param>
/// <param name="bookableResourceId">The bookable resource identifier.</param>
/// <param name="startTime">The start time.</param>
/// <param name="durationInMinutes">The duration in minutes.</param>
private static void CreateCalender(IOrganizationService service, Guid bookableResourceId, DateTime startTime, int durationInMinutes)
{
    using (var context = new CrmServiceContext(service))
    {
        var bookableResource = context.BookableResourceSet.Where(b => b.Id == bookableResourceId).FirstOrDefault();

        // Get the user calendar
        var calendar = context.CalendarSet.First(r => r.Id == bookableResource.CalendarId.Id);

        // Retrieve the calendar of the user
        Entity userCalendarEntity = service.Retrieve("calendar", calendar.Id, new ColumnSet(true));

        // Retrieve the calendar rules defined in the calendar
        EntityCollection calendarRules = (EntityCollection)userCalendarEntity.Attributes["calendarrules"];

        // Create a new inner calendar
        Entity newInnerCalendar = new Entity("calendar");
        newInnerCalendar.Attributes["businessunitid"] = new EntityReference("businessunit", ((Microsoft.Xrm.Sdk.EntityReference)(userCalendarEntity["businessunitid"])).Id);
        Guid innerCalendarId = service.Create(newInnerCalendar);

        // Create a new calendar rule and assign the inner calendar id to it
        Entity calendarRule = new Entity("calendarrule");
        //calendarRule.Attributes["duration"] = durationInMinutes;
        calendarRule.Attributes["duration"] = 1440; // 24hrs in minutes
        //It specifies the extent of the Calendar rule,generally an Integer value.
        calendarRule.Attributes["effort"] = 1.0;

        calendarRule.Attributes["extentcode"] = 1;
        calendarRule.Attributes["pattern"] = "FREQ=DAILY;COUNT=1";
        //Rank is an Integer value which specifies the Rank value of the Calendar rule
        calendarRule.Attributes["rank"] = 0;
        // Timezone code to be set which the calendar rule will follow
        calendarRule.Attributes["timezonecode"] = bookableResource.TimeZone;
        //Specifying the InnerCalendar Id
        calendarRule.Attributes["innercalendarid"] = new EntityReference("calendar", innerCalendarId);

        //Start time for the created Calendar rule
        calendarRule.Attributes["starttime"] = startTime.Date;

        calendarRules.Entities.Add(calendarRule);

        // assign all the calendar rule back to the user calendar
        userCalendarEntity.Attributes["calendarrules"] = calendarRules;
        // update the user calendar entity that has the new rule
        service.Update(userCalendarEntity);

        // Calendar rule for Working Day 
        Entity workingHourcalendarRule = new Entity("calendarrule");
        workingHourcalendarRule.Attributes["duration"] = durationInMinutes;
        //Effort available for a resource (User) during the time described by the calendar rule i.e. Capacity part in the Calendar rule
        workingHourcalendarRule.Attributes["effort"] = 1.0;
        // It is a Flag used in vary-by-day calendar rules.
        workingHourcalendarRule.Attributes["issimple"] = true;

        workingHourcalendarRule.Attributes["offset"] = startTime.Hour * 60 + startTime.Minute; //to indicate start time
        //Rank of the Calendar Rule
        workingHourcalendarRule.Attributes["rank"] = 0;
        //Sub Type of the Calendar rule.For setting Work hours it is 1.
        workingHourcalendarRule.Attributes["subcode"] = 1;
        //Type of calendar rule such as working hours, break, holiday, or time off. 0 for working hours
        workingHourcalendarRule.Attributes["timecode"] = 0;
        // Local time zone for the calendar rule.
        workingHourcalendarRule.Attributes["timezonecode"] = -1;
        //Specifying the InnerCalendar Id
        workingHourcalendarRule.Attributes["calendarid"] = new EntityReference("calendar", innerCalendarId);

        EntityCollection innerCalendarRules = new EntityCollection();
        innerCalendarRules.EntityName = "calendarrule";
        innerCalendarRules.Entities.Add(workingHourcalendarRule);

        newInnerCalendar.Attributes["calendarrules"] = innerCalendarRules;
        newInnerCalendar.Attributes["calendarid"] = innerCalendarId;
        service.Update(newInnerCalendar);
    }
}

Wednesday, November 2, 2016

Hide ‘AddButton’/‘Plus (+) Button’ and ‘Delete Buttons’ In CRM 2015 Subgrid

When we have a requirement to remove sub-grid buttons, there are two supported ways to do that.

  • Hide through Security Role (which in most cases this is not possible)
  • Hide using Ribbon Workbench (this did not worked for me and many developers had face the same issue.)
I was not able to use both and because of that I used the unsupported way(custom JavaScript command) to hide the add and delete buttons in sub-grid.

function hideAddRemoveButtonSubgrid() {
    try {
        // Hide add/remove buttons
        addEventToGridRefresh(setAddButtonDisplayNone);
    }
    catch (e) {

    }
}

var gridId = "grid_components";

function setAddButtonDisplayNone() {
    // Hide Add Button
    var addImage = document.getElementById(gridId + "_addImageButton");
    if (addImage) {
        addImage.style.display = 'none';
    }

    // Hide delete buttons
    var cont = true;
    var i = 0;
    while (cont) {
        var deleteButtionId = "gridBodyTable_gridDelBtn_" + i;
        var deleteButtion = document.getElementById(deleteButtionId);
        if (deleteButtion) {
            deleteButtion.style.display = 'none';
        }
        else {
            cont = false;
        }

        i++;
    }

}

function addEventToGridRefresh(functionToCall) {
    // retrieve the subgrid
    var grid = document.getElementById(gridId);
    // if the subgrid still not available we try again after 1 second
    if (grid == null) {
        setTimeout(function () { addEventToGridRefresh(functionToCall); }, 1000);
        return;
    }

    // add the function to the onRefresh event
    grid.control.add_onRefresh(functionToCall);

    var addImage = document.getElementById(gridId + "_addImageButton");
    if (addImage) {
        if (addImage.style.display.toLowerCase() == "block") {
            setAddButtonDisplayNone();
        }
    }
}

And finally add a page event handler to call the method "hideAddRemoveButtonSubgrid" in page load event. 

This hide the add button for the given grid, and will hide all the delete buttons in all the grids in the page.


Ref : http://missdynamicscrm.blogspot.com/2015/11/hide-add-existing-button-or-plus-button-subgrid-crm.html

Wednesday, March 25, 2015

Remove comma from number fields in CRM 2011

By default, the Whole Number Format in MSCRM uses the global number format setting and cannot be overridden at the field level.

We can control it via System and User Settings.

System Setting :-
Move to Settings-> Administration-> System Settings-> Format Tab

In the format tab click the Customize button as shown in pic below:


Now all you need to do is change the Digit Grouping Symbol and Digit group.


NOTE: This will change the format for each and every number field in CRM 2011 form including the currency grouping format as well.


But this change will reflect only for new users, but won’t reflect on existing users.
To reflect for the existing users, you need to change user settings.

User Setting :-
Move to File-> Options -> Format Tab

This will open a window as in system settings and you need to follow same steps.

But you cannot log in to all the user accounts. Hence we can update user settings by using following script.

UPDATE [CRMDB].[dbo].[UserSettingsBase]
SET [NumberGroupFormat] = 0


If you don't want to remove comma in all the whole number fields, you can use following javascript to remove the comma in CRM forms.
But this works only for form fields not on views.

document.getElementById("fieldname").value = Xrm.Page.data.entity.attributes.get("fieldname").getValue();

Sunday, July 28, 2013

Popup for SharePoint 2010 Lookups

Normally SharePoint 2010 Lookups open in a new tab.  So if you want to open it as a popup, it is really simple. Add fallowing script to your SharePoint page.

<script type="text/javascript">
var winIsDlg = 0;
(function () {
 var e, q = window.location.search.substring(1), r = /([^&=]+)=([^&]+)/g;
 while (e = r.exec(q))
    if(decodeURIComponent(e[1])=="IsDlg" && decodeURIComponent(e[2]) == "1")
    {winIsDlg=1;}
})();

$(document).ready(function(){
 if(winIsDlg==1)
 {
    $("td[id='SPFieldLookup'] a").each(
      function(){
       this.href="javascript:OpenPopUpPage('" + this.href + "')";
      });
 }
});
</script>